This article contains affiliate links — we may earn a small commission at no extra cost to you.
Advertisement
What Hiking Here Actually Means
The single thing most hikers underestimate about Mount Rainier National Park is how much elevation gain is packed into trails that look short on paper. A 5-mile round trip here might climb 1,700 feet - and that's before factoring in that you're starting at 5,400 feet with thin air and changing weather. The park's 260 miles of maintained trails cross terrain that shifts from old-growth rainforest at the lower elevations to subalpine meadows and exposed tundra above treeline. Rangers will tell you that the park's weather is the real variable: July and August can deliver 70-degree afternoons with clear skies, or you can get cold rain and clouds socked in at Paradise for three days straight.
Advertisement
Most visitors underestimate how early they need to start. The parking lots at Paradise and Sunrise fill by 9 AM on summer weekends, sometimes earlier. Cell service drops out at the Nisqually Entrance and doesn't return until you're back near Ashford. If you plan to tackle any of the mount rainier national park best hikes from the Paradise area, aim to be on the trail by 7:30 AM - not just for parking, but for the light and the crowds.
Skyline Trail: The One You Should Not Skip
Distance: 5.5 miles (loop)
Elevation Gain: 1,700 feet
Trailhead & Parking: Paradise parking lot. The lot holds roughly 450 vehicles and fills by 9 AM on summer weekends. Overflow parking lines the Paradise Valley Road shoulder. The earlier you arrive, the closer you park to the trailhead - and the less extra distance you walk on pavement before you hit dirt.
The Trail: This is the most popular trail in the park, and for good reason. It climbs from the Paradise Visitor Center at 5,400 feet up through subalpine meadows, past the Myrtle Falls viewpoint, and onto a ridge that runs straight toward the mountain. The surface changes from paved walkways near the visitor center to gravel to packed dirt and exposed rock slabs. About halfway, you cross a snowfield that can linger into August - the trail is marked with poles, but the snow can be slick. The upper section is exposed to full sun, and the wind picks up noticeably as you gain elevation.
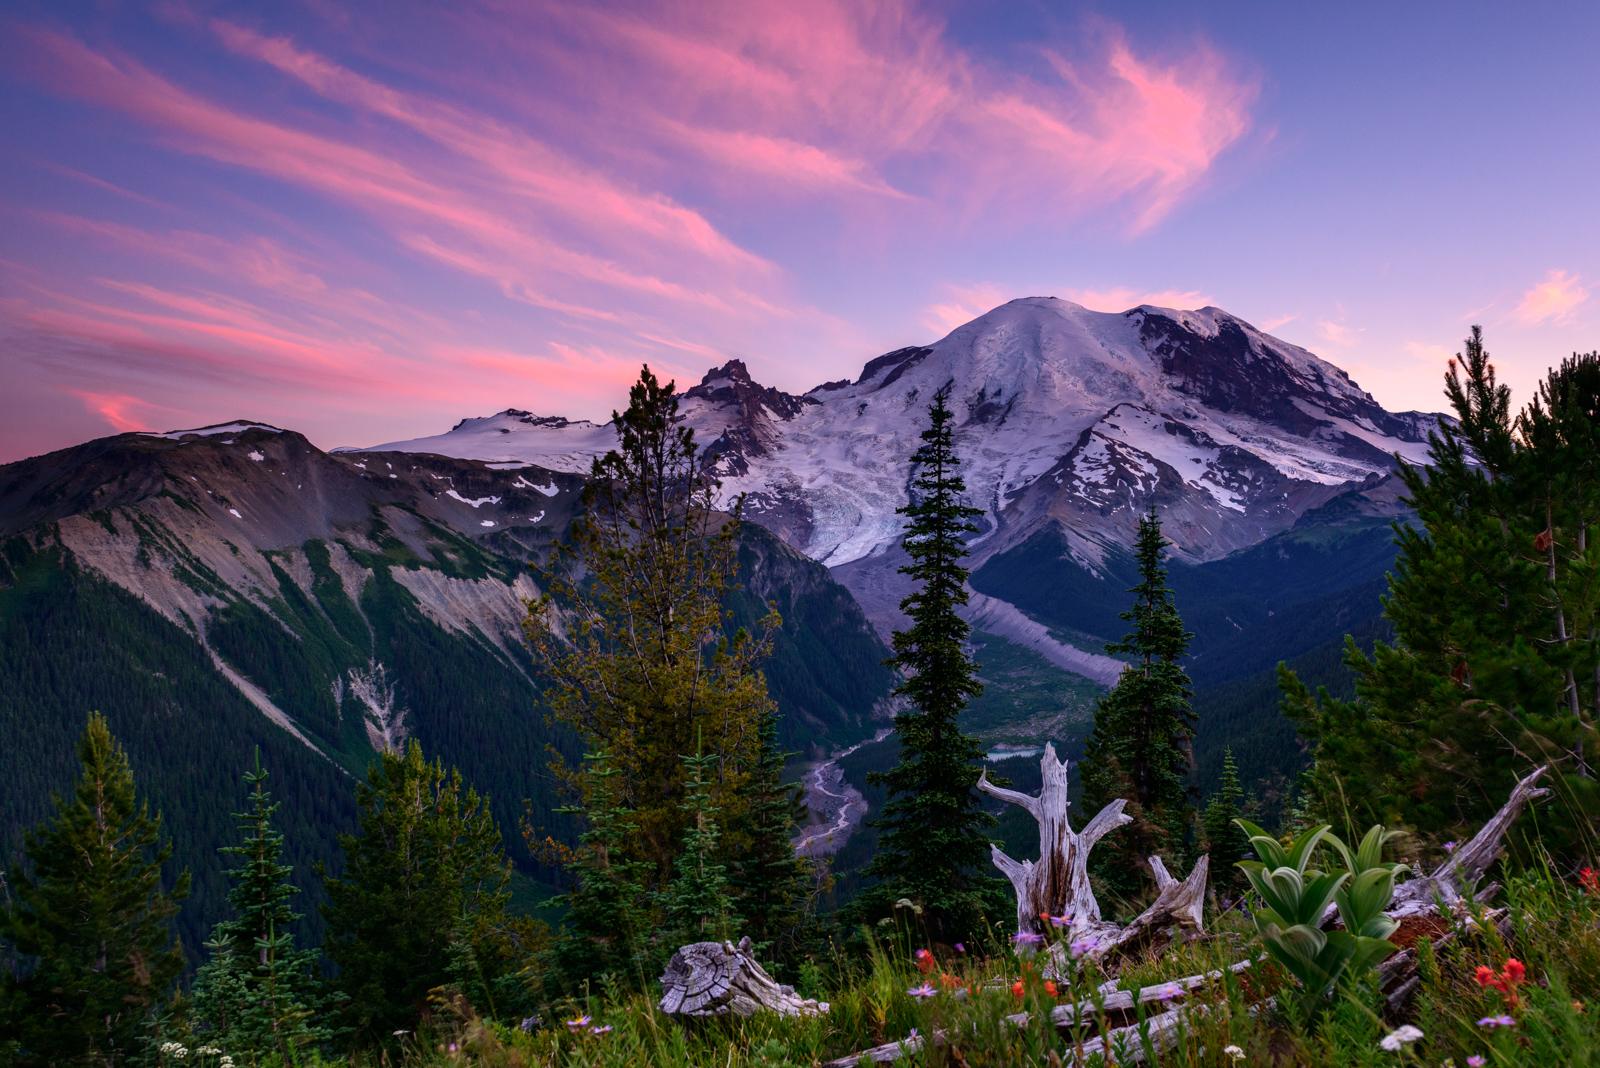
The Moment: From Panorama Point at 6,800 feet, the mountain fills your entire field of view to the north. The Nisqually Glacier spills down the mountain's flank directly in front of you. To the south, the Tatoosh Range stretches across the horizon. On a clear day, you can trace the entire Paradise Valley below.
What Most Underestimate: The elevation gain is relentless. It's not steep in any single section, but it never lets up for the first 2.5 miles. Most visitors also don't realize the trail has significant snow coverage through July - bring traction devices even in mid-summer.
Best Time: Late July through September for snow-free conditions. Start by 8 AM at the latest.
Photo: NPS via NPS.gov (Public Domain)
Sunrise Area Trails
The Sunrise area sits at 6,400 feet, making it the highest point in the park reachable by car. The trails here offer direct access to alpine terrain without the long climb required from Paradise. The Sunrise Road typically opens in late June and closes in mid-October.
Burroughs Mountain Trail
Distance: 6.5 miles (loop with out-and-back sections)
Elevation Gain: 1,800 feet
Trailhead & Parking: Sunrise parking lot, near the visitor center. This lot fills by 9:30 AM on summer weekends. The road from the White River entrance is narrow and winding - allow 45 minutes from the entrance gate to the lot.
The Trail: This trail climbs across the most accessible tundra in the Cascade Range. It passes through three distinct Burroughs - First, Second, and Third - each one higher and more exposed than the last. The trail surface is mostly packed dirt and rock, with some loose scree on the steeper sections. Above treeline the entire way, the exposure is total. The wind here is a fact of life, not a possibility.
The Moment: From Third Burroughs at roughly 7,800 feet, you're level with the Emmons Glacier, the largest glacier in the contiguous United States. The mountain is close enough that you can hear ice cracking. The turquoise of the glacial lake below is visible on clear days.
What Most Underestimate: The distance from Second to Third Burroughs is longer than it looks, and the false summits are demoralizing. The wind at Third Burroughs can make standing difficult. Pack a windbreaker even on warm days.
Best Time: July through September. Morning light is better for photography. Afternoon clouds often roll in by 2 PM.
Emmons Moraine Trail
Distance: 1.5 miles (out and back)
Elevation Gain: 200 feet
Trailhead & Parking: White River Campground, near site E. Limited parking at the trailhead - about 15 spaces. The campground parking area serves as overflow.
The Trail: A short, easy hike through forest to a viewpoint overlooking the Emmons Glacier terminus. The trail is well-maintained and mostly flat, with some roots and rocks underfoot. The payoff is disproportionate to the effort.
The Moment: The turquoise glacial lake at the moraine is the color of copper sulfate. The Emmons Glacier extends from the mountain down to the valley floor, its surface cracked and crevassed. You can see the glacier's terminal moraine - the pile of rock debris it pushes ahead of itself.
What Most Underestimate: How quickly you'll want to stay longer than the trail's short distance suggests. Most people spend 30 minutes at the viewpoint.
Best Time: Late June through October. Morning light hits the glacier face directly.
Paradise Area Trails
Paradise is the most developed area in the park and the hub for hiking. The Paradise Road is open year-round from the Nisqually Entrance, but snow covers the ground well into June.
Nisqually Vista Trail
Distance: 1.2 miles (loop)
Elevation Gain: 200 feet
Trailhead & Parking: Paradise parking lot, near the visitor center. Same parking constraints as the Skyline Trail.
The Trail: A paved, accessible loop that offers year-round views of the Nisqually Glacier. The trail is wide enough for strollers and wheelchairs. It's the easiest way to get close to the mountain without committing to serious elevation gain.
The Moment: The Nisqually Glacier is directly across the valley, its surface visible as a river of ice descending from the mountain. The trail has interpretive signs explaining glacial movement.
What Most Underestimate: That this counts as a real hike. It's short and easy, but the views are comparable to trails that require three times the effort.
Best Time: Year-round. In winter, the trail is snow-covered and requires snowshoes or traction devices.
Bench and Snow Lakes
Distance: 2 miles (out and back)
Elevation Gain: 400 feet
Trailhead & Parking: Stevens Canyon Road, 1.5 miles east of Reflection Lakes. Small pullout with about 10 spaces. The parking situation here is tight - the pullout fills by 8:30 AM.
The Trail: A short, moderate trail that drops through forest to two small lakes. The trail is rocky in sections and can be muddy near the lakes. The descent to the lakes is steep enough that you'll feel it on the return climb.
The Moment: The reflection of Mount Rainier in Snow Lake on a calm morning is the kind of view that makes you forget you have to climb back out. Bench Lake is smaller but has a more intimate setting.
What Most Underestimate: The climb back to the trailhead. It's only 400 feet of gain, but it's concentrated in the last half-mile.
Best Time: July through September. Early morning for calm water.
Waterfalls from Longmire to Paradise
Distance: Variable (1-4 miles total, depending on how many you visit)
Elevation Gain: Minimal to moderate
Trailhead & Parking: Multiple pullouts along the Paradise Road between Longmire and Paradise.
The Trail: The trail to Narada Falls is the most accessible - a short, paved path leads to a viewpoint. Carter Falls requires a 1.5-mile round trip hike through old-growth forest. Christine Falls is visible from the road. The Carter Falls Trail footbridge over the Nisqually River has been dislodged by winter storms as of 2026, with no safe crossing available - check current conditions before heading out.
The Moment: Narada Falls drops 168 feet in a single plunge. The spray from the falls creates rainbows on sunny afternoons.
What Most Underestimate: How much water these falls carry in late spring and early summer. The volume drops significantly by August.
Best Time: May through July for maximum water flow.
Photo: NPS via NPS.gov (Public Domain)
Moderate and Strenuous Options
Rampart Ridge Trail
Distance: 4 miles (loop)
Elevation Gain: 1,300 feet
Trailhead & Parking: Longmire area, near the National Park Inn. Parking is available at the Longmire lot, which is larger than Paradise but fills on busy weekends.
The Trail: This loop climbs through old-growth forest onto the Rampart Ridge, a remnant of an ancient lava flow. The trail is well-defined but steep in sections. The surface is forest duff and exposed roots for most of the route. The ridge itself offers intermittent views through the trees rather than a single panoramic overlook.
The Moment: The mid-point of the ridge offers views of the Nisqually River Valley and Mount Rainier in the distance. The forest on the descent is some of the oldest in the park.
What Most Underestimate: That this is a loop, not an out-and-back. The return leg is mostly downhill, but it's also where the roots are thickest.
Best Time: June through October. The trail is snow-free earlier than Paradise trails.
Shriner Peak Fire Lookout
Distance: 7 miles (out and back)
Elevation Gain: 3,400 feet
Trailhead & Parking: Stevens Canyon Road, near the Ohanapecosh area. Limited parking at the trailhead - about 12 spaces.
The Trail: This is the steepest maintained trail in the park. It climbs from 2,800 feet to 5,834 feet at the fire lookout, gaining elevation at a relentless grade. The trail is mostly forested, but the upper section opens to views. The fire lookout is one of four historic lookouts in the park and is occasionally staffed.
The Moment: From the lookout, the mountain dominates the horizon. You can see the Tatoosh Range, the Goat Rocks, and on clear days, Mount Adams and Mount St. Helens.
What Most Underestimate: The elevation gain. This trail gains 3,400 feet in 3.5 miles. That's roughly 1,000 feet per mile. Your calves will have strong opinions about every switchback.
Best Time: July through October. The trail is snow-free later than most due to its north-facing aspects.
Gobblers Knob Fire Lookout
Distance: 11 miles (out and back)
Elevation Gain: 2,800 feet
Trailhead & Parking: Westside Road, which is closed to vehicles beyond the first mile. Park at the Westside Road closure gate and hike or bike the first 3.5 miles of road before reaching the trailhead.
The Trail: A long day hike that requires extra distance just to reach the trailhead. The Westside Road is open to bicycles, and the park's bike trails are challenging and scenic. The trail itself climbs through forest to a rocky outcrop with a historic fire lookout.
The Moment: The lookout sits on a rocky knob with 360-degree views. The mountain feels close enough to touch.
What Most Underestimate: The extra 7 miles round trip on the road before you even start the trail. This is a full-day commitment.
Best Time: July through September.
Seasonal Trail Conditions
June: Snow covers most trails above 5,000 feet. The Paradise area still has significant snowpack. Sunrise Road typically opens late June. Traction devices are essential.
July: Snow melts rapidly, but patches remain on north-facing slopes and at higher elevations. Wildflowers begin blooming at Paradise in mid-July. The Skyline Trail is usually snow-free by late July.
August: Prime hiking season. Trails are mostly snow-free above 6,000 feet. Wildflowers peak at Paradise in early to mid-August. Afternoon thunderstorms are possible.
September: Cooler temperatures, fewer crowds. Fall color begins at higher elevations in mid-September. Snow can return to the highest trails by late September.
November through May: Winter conditions. Only the Nisqually Entrance provides vehicle access. Paradise Road is open but requires tire chains. Snowshoeing and cross-country skiing replace hiking.
Photo: NPS via NPS.gov (Public Domain)
Trailhead Logistics
Paradise parking: The lot fills by 9 AM in July and August. Overflow parking along Paradise Valley Road adds a half-mile walk to the trailhead. The earlier you arrive, the closer you park.
Sunrise parking: Fills by 9:30 AM. The road from the White River entrance is narrow with limited turnouts. Allow 45 minutes driving time from the entrance gate.
Stevens Canyon Road: Seasonal closure from mid-October through late May. The road provides access to Bench and Snow Lakes, Shriner Peak, and several waterfall viewpoints.
Cell service: Drops out at the Nisqually Entrance. No service at Paradise or Sunrise. Limited service at Longmire. Download maps and trail descriptions before you arrive.
Water sources: Treat all water from streams and lakes. Giardia is present. Carry enough water for the full hike - don't rely on finding potable sources on trail.
Bear canisters: Not required for day hikes, but recommended for food storage. Black bears are present in the park. Store all food properly.
Ranger station for conditions: The Longmire Museum and Paradise Visitor Center provide current trail conditions. Check the board outside each visitor center for the latest updates.
What to Carry
The conditions at Mount Rainier demand specific gear that a generic 10-essentials list won't cover.
Footwear: Boots with ankle support, not trail runners. The trails are rocky, rooty, and often wet. Low-cut shoes will leave you with bruised feet and wet socks. Waterproofing matters - morning dew on meadows soaks through mesh uppers in minutes.
Traction devices:Microspikes or similar traction devices for the Skyline Trail through July. The snowfields at Panorama Point persist into August in some years. Yak Trax won't cut it - you need actual spikes.
Rain gear: A waterproof jacket and pants, not a packable emergency poncho. Mountain weather changes in minutes. Rangers will tell you that "sunny at Paradise" and "soaking wet at Panorama Point" are not contradictory statements.
Sun protection: Sunscreen, sunglasses, and a hat. The exposure at elevation with snow reflection is intense. Sunburn happens faster than you expect.
Extra insulation: A mid-layer fleece or puffy jacket. Temperatures drop 15-20 degrees with cloud cover, and the wind at Burroughs Mountain or Panorama Point can cut through a single layer.
Water capacity: Carry at least 2 liters for a half-day hike, 3 liters for a full day. The trails are dry - there aren't reliable water sources on most routes above treeline.
Navigation: A downloaded map or GPS app. Cell service drops out at the park boundary. The trail junctions at Paradise are well-signed, but the Burroughs Mountain Trail has confusing intersections where the route isn't obvious.
Photo: NPS via NPS.gov (Public Domain)
Practical Takeaways
Start before 8 AM. The parking lots at Paradise and Sunrise fill by 9 AM, and the afternoon clouds roll in by 2 PM. Morning light is superior for photography and the trails are emptier.
The Skyline Trail is the one hike you should not skip, but don't underestimate its difficulty. The 1,700 feet of gain at 5,400-6,800 feet elevation will tax your lungs if you're coming from sea level.
The Burroughs Mountain Trail at Sunrise is the best alternative to Paradise. It offers similar alpine terrain with slightly fewer crowds and a different perspective of the mountain.
Bring traction devices for any trail above 5,000 feet before August. The snowfields at Panorama Point and on the Burroughs can be icy well into summer.
The Ohanapecosh Campground area is closed for construction in 2026, including all campsites, the visitor center, restrooms, and river access. Plan accordingly.
The Carbon River and Mowich Lake areas are inaccessible in 2026 due to the SR 165 bridge closure. No vehicle, bicycle, or pedestrian access.
Check the trail conditions board at the Paradise Visitor Center or Longmire Museum before heading out. Winter storms cause washouts that the website may not reflect immediately.
Pack for weather 20 degrees colder than the Paradise forecast. The difference between the parking lot and the ridgeline is significant.
The Emmons Moraine Trail is the best short hike in the park. A mile and a half to a glacial lake the color of turquoise, with the largest glacier in the contiguous US directly above you.
If you want solitude, skip the Paradise and Sunrise areas entirely. The Shriner Peak, Gobblers Knob, and Rampart Ridge trails see a fraction of the traffic and offer comparable rewards. The price is elevation gain - and it's worth paying.